Using Cohesity DataProtect for PostgreSQL
Suggest editsThis section features use cases that show how backups are taken and restored from EDB Postgres Advanced Server using Cohesity DataProtect for PostgreSQL.
Setting a Protection Policy with Cohesity DataProtect for PostgreSQL
Cohesity has standard protection policies that are available when you install the software, but you can also create your own specific policies to backup your data. These policies are a reusable set of settings that define how and when objects are protected, replicated and archived.
Create a Standard Policy
In the Cohesity Dashboard, select
Data Protection, then selectPolicies. When you are brought to the Policy page click onCreate Policylocated at the top right of the page.Specify a Policy Name for your protection policy.
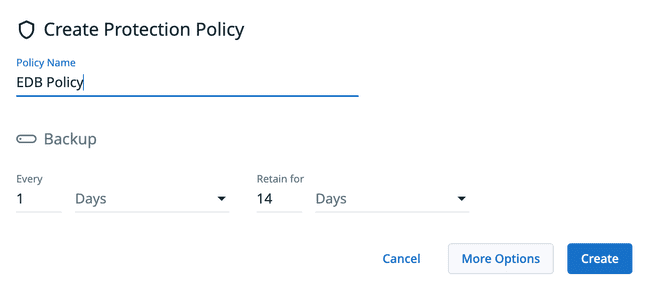
Specify all the options for when you want backups captured.
The options section is highly customizable to meet your needs. Select
More Optionsto view them. As an example, you will see options like Periodic Full Backups, Replications, Archives and Log Backups.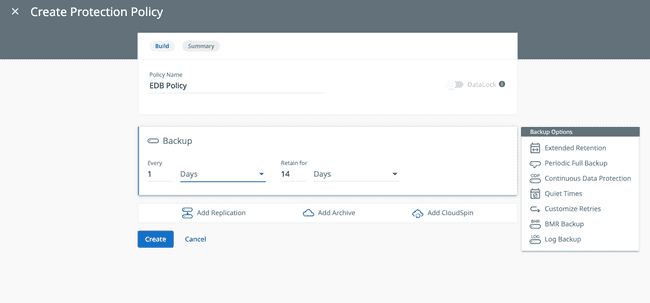
After you have specified all of your options for your backup policy, click
Createand your policy will then be visible in the list of policies on the Policies page.
Protect an EDB Postgres Advanced Server Source with a Policy
From the Cohesity Dashboard select
Data Protectionthen selectProtection.Select
Protecton the top-right of the page and selectUniversal Data Adapter.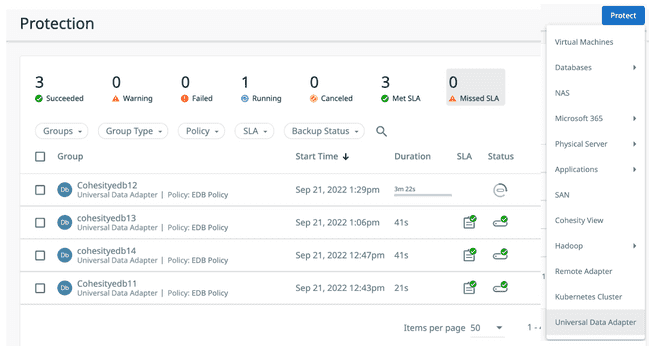
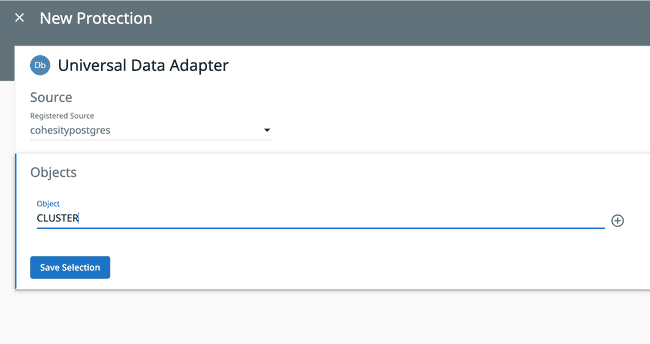
From the Source drop down menu select the
EDB Postgres Advanced Serversource that you have registered.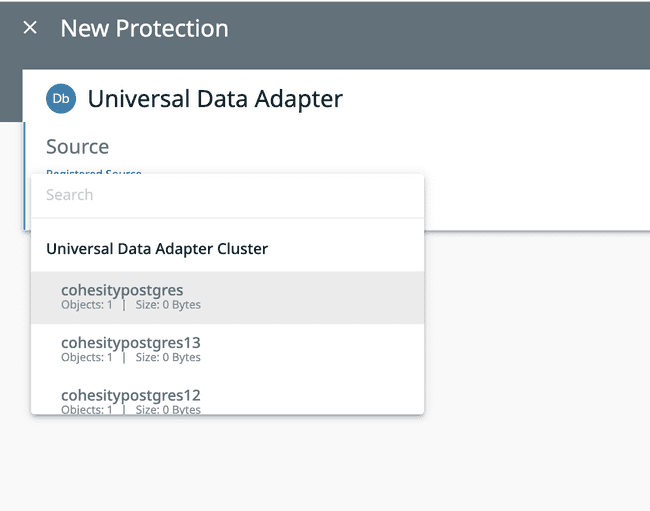
In the Objects section specify a name for the Server to be protected. This name does not affect the server that is being backed up. It is used by Cohesity to help track your backups.
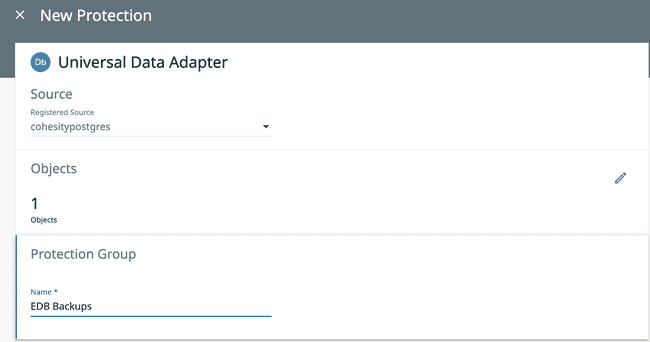
In the Protection Group field, give your source a unique protection name that you can identify.
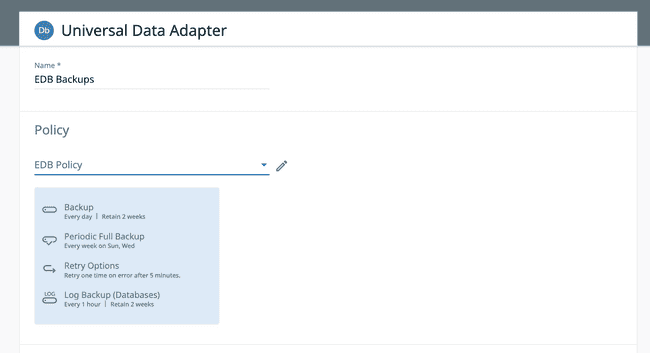
In the Policy field, select your policy that you have created from the drop down list.
Check the Settings that appear and click on
Additional Settingson the bottom to make sure you have all the appropriate settings for your protection group. When everything is confirmed, clickProtect.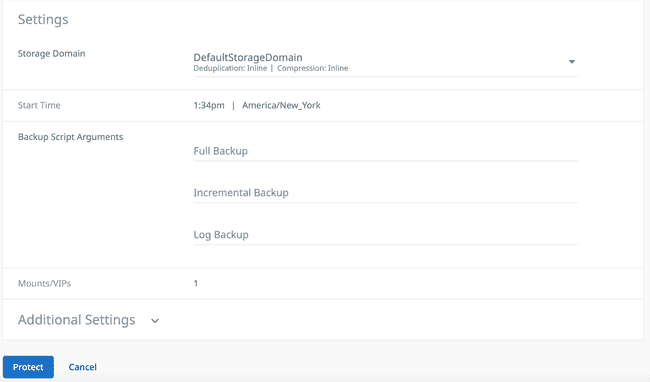
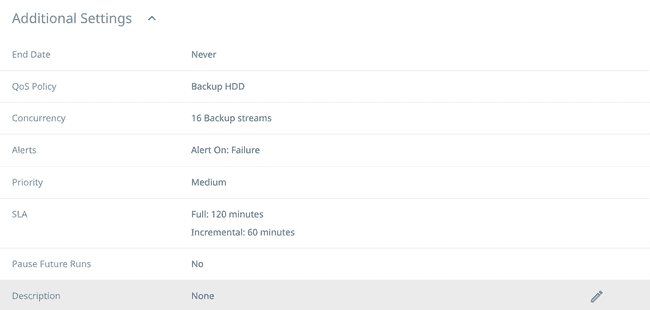
After you have protected your sources, you will see them on the main Protection page.
- Click on a specific source to see the various backup runs that were set during Policy creation.
- Click on a run, then click the name in the Objects list to view the logs from that specific run.
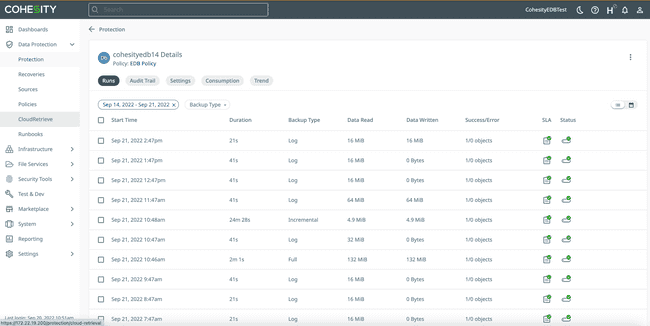

Restore an EDB Postgres Advanced Server Instance from a Cohesity Protection Run
You can restore an EDB Postgres Advanced Server instance to the same EDB Postgres Advanced Server or to a different server. At the moment the restores are full database restores, granular restores are not supported yet.
Recovery Script Arguments are an important piece of the recovery process, they define script parameters for your EDB Postgres Advanced Server recovery. The restore script argument is: - -target-dir= with the second half being the path on the target cluster where you want to restore the data.
EDB Postgres Advanced Server Database Prerequisites Before Recovery Initiation
Before you can recover your EDB Postgres Advanced Server instance, you will need to make sure that the server is not running. Verify that your server is stopped, if it is running, stop it.
For Example: Log in to your machine as a Root user, and with systemctl commands first check the status of your instance to determine whether it is up, systemctl status edb-as-(version), and if it is running use systemctl stop edb-as-(version) to stop your server for the recovery to take place.
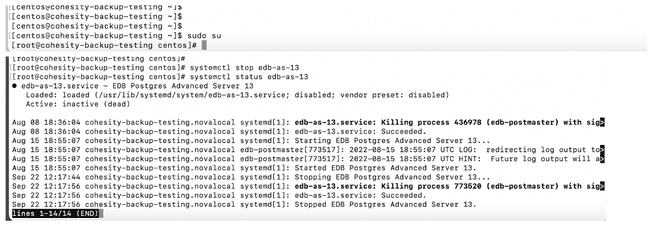
Cohesity Recovery of EDB Postgres Advanced Server Data
In the Cohesity Dashboard, select
Data ProtectionthenRecoveries.Click
Recoverat the top right of the page and then selectUniversal Data Adapterfrom the list of sources.Search for the Protection Group that contains the snapshots to recover from by either entering characters of the Protection Group name or entering * for the wildcard option.
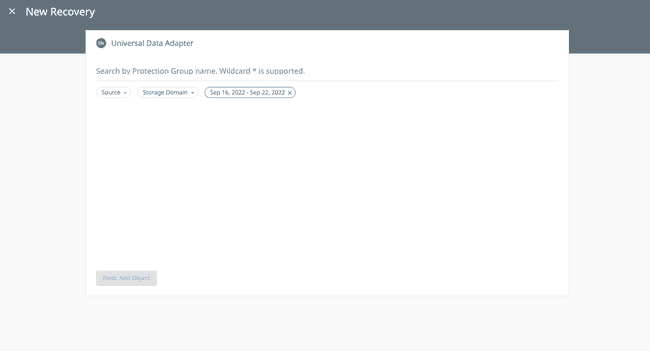
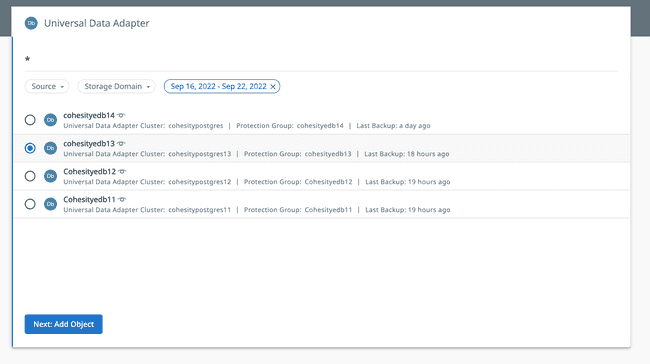
Select the Protection Group from the search results that you wish to recover.
In the Object field name specify a name for the server to be restored. This name does not affect the restore. It is used by Cohesity to help track your backups and restores. By default, the latest snapshot is selected to recover from. If you want to select a point-in-time recovery or a specific data backup that you took, you can click on the pencil to edit the recovery point.
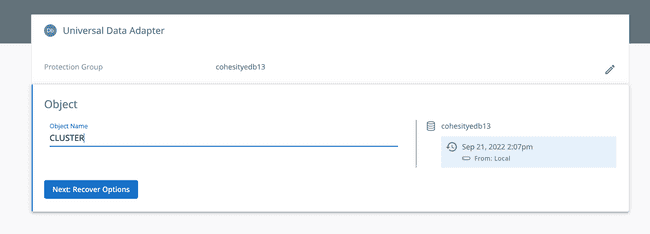
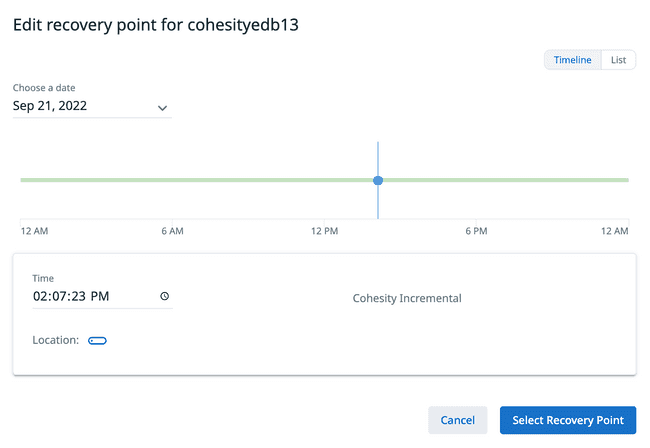
Note from Cohesity: ”Only cluster level restore is supported and object-level restore is not yet supported, hence the given object name will be ignored by PostgreSQL restore workflow.”
Click
Next: Recovery OptionsSelect
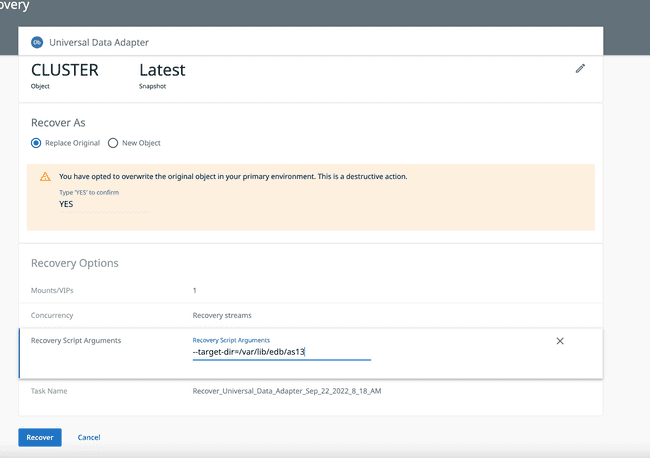
Replace OriginalorRecover to a New Objectdepending on your requirement.In the Recovery Options area, you will configure the following options:
- Mounts/VIPs: The number of IP's to be used.
- Concurrency: The number of parallel streams to read data from Cohesity storage.
- Recovery Script Arguments: The path on the target cluster for where you want to restore data. An example looks like:
- - target-dir=/var/lib/edb/as13/data. - Task Name: Keep the default name or create your own name for the recovery task.
Click
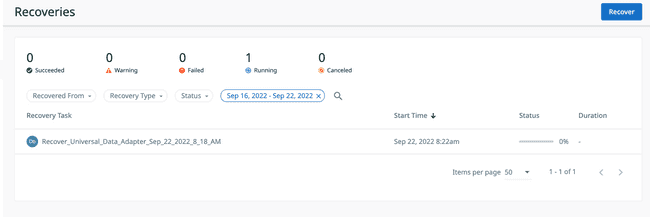
Start Recoveryand your recovery process will be under way.You can see a Status message on the main Recoveries page once the process has completed.
Click on the
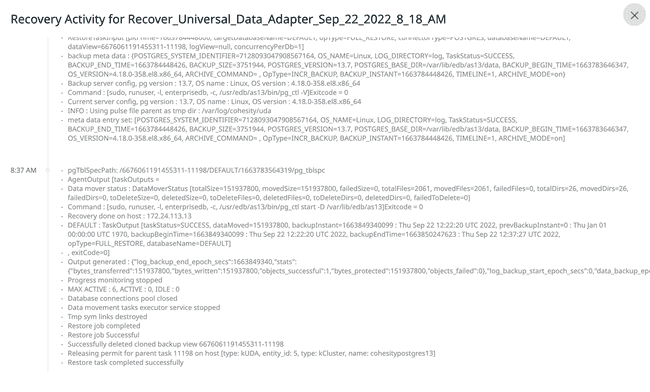
Recovertask, then clickShow Subtasksto view the logs from the recovery run.
Recoveries Process Bar
Recovery Instance Log Information
- After the restore has completed successfully, login to your EDB Postgres Advanced Server instance and check that the restore operation successfully recovered the data.
Example: Database “as13backup” dropped before the recovery:
   edb=# DROP DATABASE as13backup;
DROP DATABASE
edb=# \l
                                           List of databases
   Name    |    Owner     | Encoding |   Collate   |    Ctype    | ICU |       Access privileges
-----------+--------------+----------+-------------+-------------+-----+-------------------------------
 edb       | enterprisedb | UTF8     | en_US.UTF-8 | en_US.UTF-8 |     |
 postgres  | enterprisedb | UTF8     | en_US.UTF-8 | en_US.UTF-8 |     |
 template0 | enterprisedb | UTF8     | en_US.UTF-8 | en_US.UTF-8 |     | =c/enterprisedb              +
           |              |          |             |             |     | enterprisedb=CTc/enterprisedb
 template1 | enterprisedb | UTF8     | en_US.UTF-8 | en_US.UTF-8 |     | =c/enterprisedb              +
           |              |          |             |             |     | enterprisedb=CTc/enterprisedb
(4 rows)

edb=# \q
Example: After the restore is successful, checking the databases to see if “as13backup” is restored. In our example you can see that it was restored, along with the data.
edb=# \l
                                           List of databases
    Name    |    Owner     | Encoding |   Collate   |    Ctype    | ICU |       Access privileges
------------+--------------+----------+-------------+-------------+-----+-------------------------------
 as13backup | enterprisedb | UTF8     | en_US.UTF-8 | en_US.UTF-8 |     |
 edb        | enterprisedb | UTF8     | en_US.UTF-8 | en_US.UTF-8 |     |
 postgres   | enterprisedb | UTF8     | en_US.UTF-8 | en_US.UTF-8 |     |
 template0  | enterprisedb | UTF8     | en_US.UTF-8 | en_US.UTF-8 |     | =c/enterprisedb              +
            |              |          |             |             |     | enterprisedb=CTc/enterprisedb
 template1  | enterprisedb | UTF8     | en_US.UTF-8 | en_US.UTF-8 |     | =c/enterprisedb              +
            |              |          |             |             |     | enterprisedb=CTc/enterprisedb
(5 rows)

edb=# \c as13backup
psql (14.4.0, server 13.7.11)
You are now connected to database "as13backup" as user "enterprisedb".

as13backup=# \dir
                          List of relations
 Schema |       Name       | Type  |    Owner     |      Table
--------+------------------+-------+--------------+------------------
 public | index_sales      | index | enterprisedb | tp_sales_db
 public | tp_dept_dname_uq | index | enterprisedb | tp_department_db
 public | tp_dept_pk       | index | enterprisedb | tp_department_db
(3 rows)

as13backup=# select * from tp_department_db
as13backup-# ;
 deptno |    dname    | location
--------+-------------+----------
     10 | Development | Pakistan
     20 | Testing     | Pakistan
     30 | CM          | Pakistan
     40 | Marketing   | India
(4 rows)_
After a restore, Cohesity restarts the database automatically using a “sudo, runuser, -l, enterprisedb, -c, /usr/edb/as(version)/bin/pg_ctl start -D /var/lib/edb/as(version)/data” command instead of starting the database with systemctl. This does not allow the server to be tracked by systemd. If you want to track the server using systemd, you will need to stop and start the database. Go to your server and use ./pg_ctl -D /var/lib/edb/as(version)/ stop and then login as the root user and issue the systemctl edb-as-(version) start command to allow your server to be tracked by systemd.
- On this page
- Setting a Protection Policy with Cohesity DataProtect for PostgreSQL
- Create a Standard Policy
- Protect an EDB Postgres Advanced Server Source with a Policy
- Restore an EDB Postgres Advanced Server Instance from a Cohesity Protection Run
- EDB Postgres Advanced Server Database Prerequisites Before Recovery Initiation
- Cohesity Recovery of EDB Postgres Advanced Server Data
Could this page be better? Report a problem or suggest an addition!