Using Esri ArcGIS Pro and Esri ArcGIS Enterprise with EDB Postgres Advanced Server
Suggest editsCreate File Geodatabase
Esri has created a new format for storing data with the geodatabase. If you’re creating or saving data, it is recommended to use this format instead of shapefiles. Data stored in a geodatabase will take up less space and perform faster than shapefiles.
The following steps take you through adding a geodatabase to Esri ArcGIS Pro and creating an Enterprise Geodatabase from that data, using the sample HongKong database. You can substitute or create your own database in place of this.
Go to the HongKong GDB, or another downloaded geodatabase, as instructed in the Download GIS Database steps, and click
Download.Locate and unzip HongKong.gdb.zip file that was downloaded.
HongKong.gdb contents
Inside the zip file is a geodatabase file:
HongKong.gdb. Inside the geodatabase there are a lot of files with mysterious names. These are for functionalities in the geodatabase, do not do anything with them.Return to ArcGIS Pro and select
Newthen selectMapfrom the options underNew Project, name your project and specify where it will be stored and clickOK.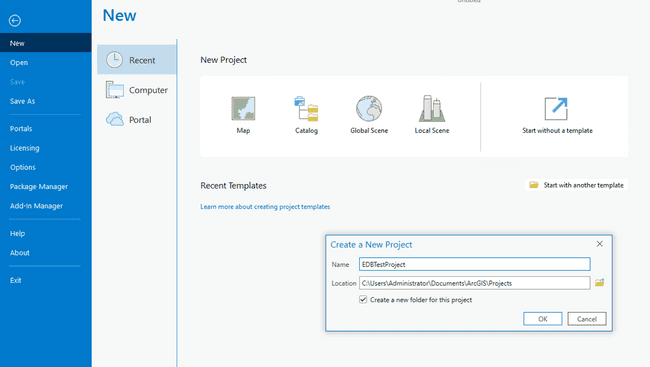
In the
Catalogpane, on theProjecttab, right-clickDatabasesand chooseAdd Database.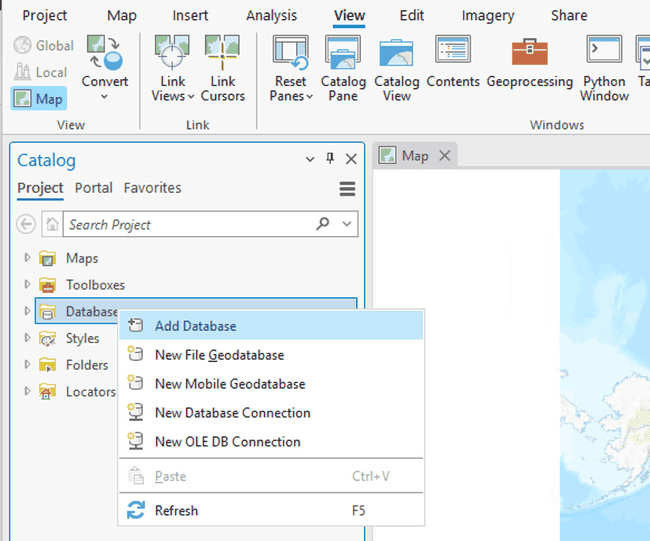
Adding geodatabase data
You can add the geodatabase data the same way you would add a shapefile (with the Add Data button), or you can also add it with Add Database options in ArcGIS.
Browse to and select
HongKong.gbd, clickOK.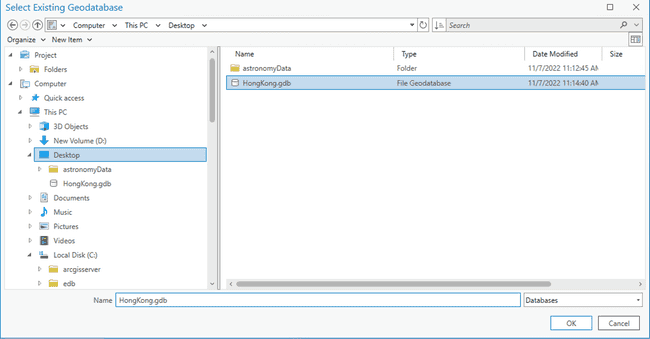
In the
Catalogpane expand theDatabasesfolder.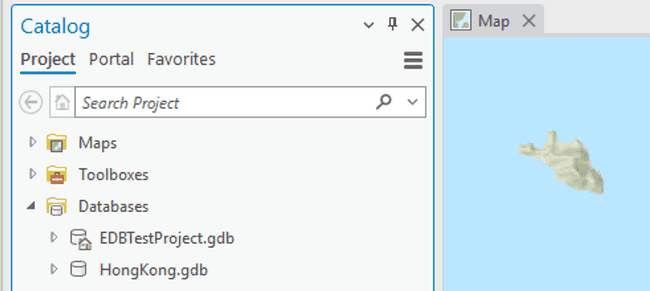
Default.gdb
There will be a few geodatabases listed. If Default.gdb is present, it was created automatically when you created the project. It is empty now, but any new data that you create in this project will land here by default.
Add the HongKong.gbd geodatabase to the map by selecting the arrow next to it, and right-clicking each item and selecting
Add to Newthen selectMap.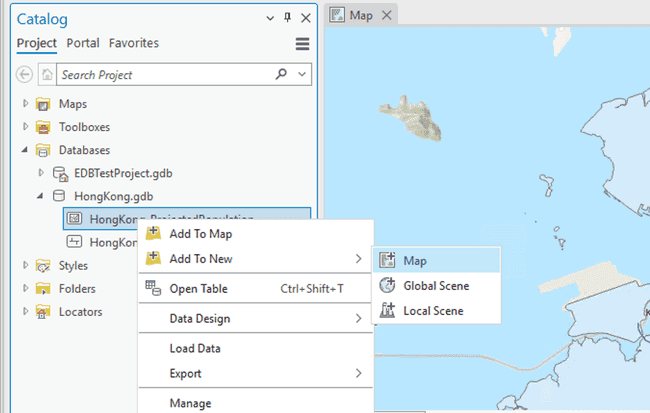
Expand the
HongKong.gbddatabase to view the data.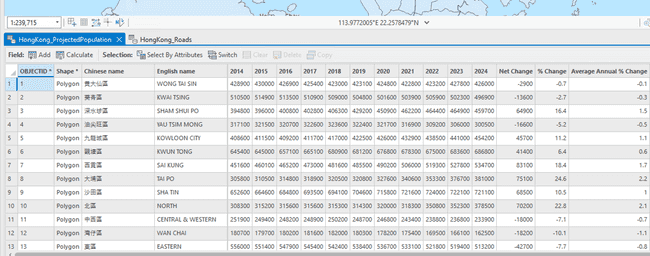
Create Database Connection
To create a database connection, follow the steps below.
Connect to the database by right-clicking the
Databasesfolder in theCatalogpane, and clickNew Database Connection. TheDatabase Connectiondialog box appears.Provide the information necessary to connect to your new database as an EDB Postgres Advanced Server superuser. Since you will use this connection file in a geoprocessing tool, you must check
Save username and password. After the tool is run, you should either uncheck this option in the connection file, connect as a different user, or delete the connection file to prevent other users with access to this file from logging in to the geodatabase as a database administrator.Click
OKto create the connection.A new connection file is created with Database Connection and will appear under
Databasesin theContentspane.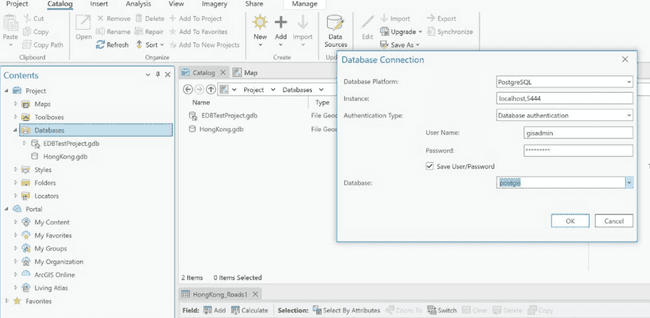
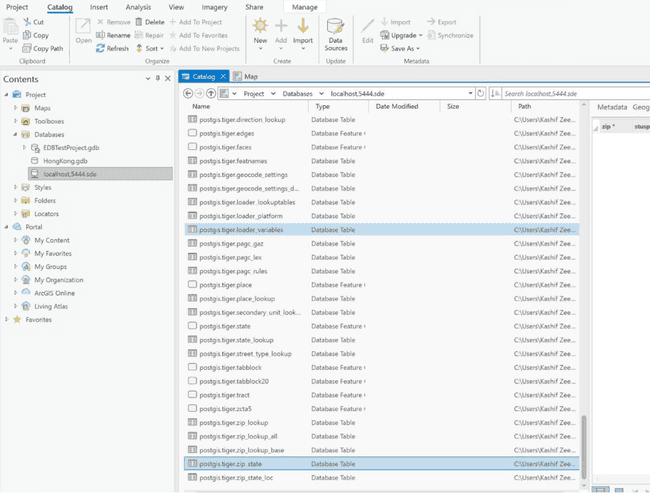
PostGIS files are added with a successful connection.
Create Enterprise Geodatabase
Enterprise Geodatabases create geodatabase system tables, stored procedures, functions, and types in an existing database, which enable geodatabase functionality in the database.
The Create Enterprise Geodatabase tool creates a database, storage locations, and a database user to be used as the geodatabase administrator and owner of the geodatabase depending on the database management system (DBMS) used. It grants the geodatabase administrator privileges required to create a geodatabase, and then creates a geodatabase in the database.
Open
Analysisthen openTools.
Open
ToolBoxthen select the following nested options:Data Management Tools, then selectGeodatabase Administration, and finally selectCreate Enterprise Geodatabase.Enter the connection information for your EDB Postgres Advanced Server instance by providing the platform, in this case PostgreSQL, the Instance connection information and the Database information used to create the connection.
Select the Keycodes Authorization file created in the Enable Enterprise Geodatabase section.
Select
PostGISunder Spatial Type.Click on
Run.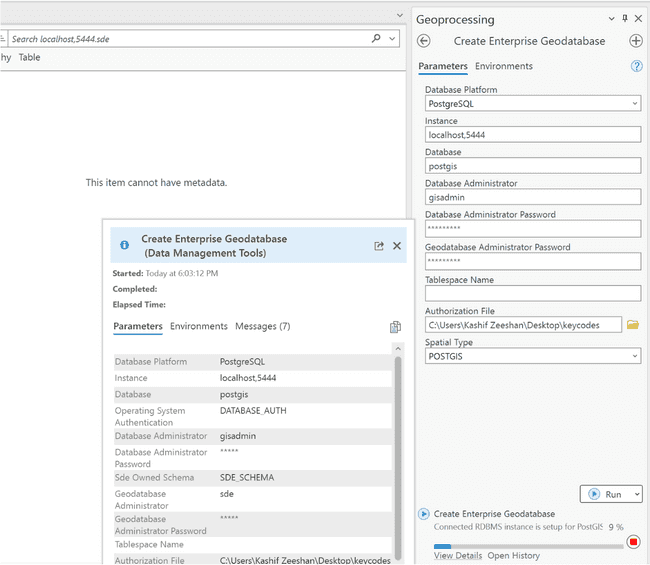
When the run is completed and successful, you will see a green box displaying the message
Create Enterprise Geodatabase completed., from there you can clickView Detailsto read more information.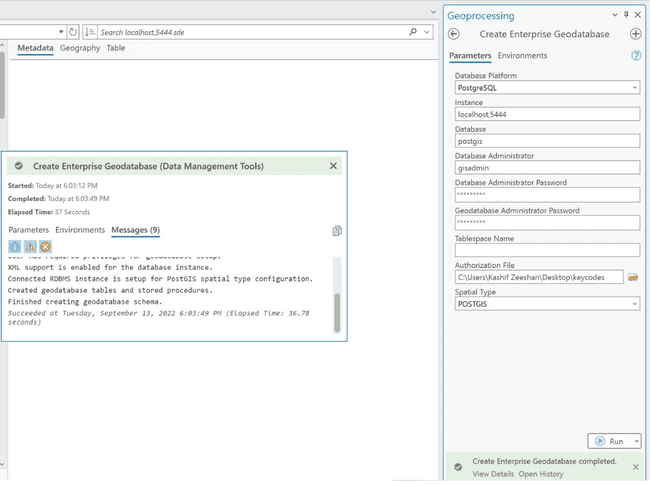
The Schema will be created on your EDB Postgres Advanced Server Instance with its geodatabase objects.
Note
If you hover your mouse over your Database Connection in the
Catalogpane it will display the message "Enterprise Connection" to easily keep track of your Enterprise Geodatabases within your project.
The following code demonstrates the
sdeschema that is created after the Enterprise Geodatabase has been created in Esri ArcGIS Pro:C:\Program Files\edb\as14\bin> C:\Program Files\edb\as14\bin>psql.exe -p 5444 -d postgis -U gisadmin psql (14.4.0) WARNING: Console code page (437) differs from Windows code page (1252) 8-bit characters might not work correctly. See psql reference page "Notes for Windows users" for details. Type "help" for help. postgis=# \dn List of schemas Name | Owner ------------+-------------- gisadmin | gisadmin public | enterprisedb sde | sde tiger | gisadmin tiger_data | gisadmin topology | gisadmin (6 rows) postgis=# postgis=# \dt List of relations Schema | Name | Type | Owner --------+----------------------------+-------+---------- public | roads | table | gisadmin public | sde_spatial_references | table | sde public | spatial_ref_sys | table | gisadmin public | us_gaz | table | gisadmin public | us_lex | table | gisadmin public | us_rules | table | gisadmin sde | gdb_conflicts | table | sde sde | gdb_itemrelationships | table | sde sde | gdb_itemrelationshiptypes | table | sde sde | gdb_items | table | sde sde | gdb_itemtypes | table | sde sde | gdb_locks | table | sde sde | gdb_replicalog | table | sde sde | gdb_tables_last_modified | table | sde sde | i10 | table | sde sde | i11 | table | sde sde | i6 | table | sde sde | i7 | table | sde sde | i8 | table | sde sde | i9 | table | sde sde | sde_archives | table | sde sde | sde_branch_tables_modified | table | sde sde | sde_branches | table | sde sde | sde_column_registry | table | sde sde | sde_coordinate_systems | table | sde sde | sde_dbtune | table | sde sde | sde_layer_locks | table | sde sde | sde_layer_stats | table | sde sde | sde_layers | table | sde sde | sde_lineages_modified | table | sde sde | sde_locators | table | sde sde | sde_logfile_pool | table | sde sde | sde_metadata | table | sde sde | sde_multibranch_tables | table | sde sde | sde_mvtables_modified | table | sde sde | sde_object_ids | table | sde sde | sde_object_locks | table | sde sde | sde_process_information | table | sde sde | sde_raster_columns | table | sde sde | sde_server_config | table | sde sde | sde_state_lineages | table | sde sde | sde_state_locks | table | sde sde | sde_states | table | sde sde | sde_table_locks | table | sde sde | sde_table_registry | table | sde sde | sde_tables_last_edit_time | table | sde sde | sde_tables_modified | table | sde sde | sde_version | table | sde sde | sde_versions | table | sde sde | sde_xml_columns | table | sde sde | sde_xml_index_tags | table | sde sde | sde_xml_indexes | table | sde tiger | addr | table | gisadmin tiger | addrfeat | table | gisadmin tiger | bg | table | gisadmin tiger | county | table | gisadmin tiger | county_lookup | table | gisadmin tiger | countysub_lookup | table | gisadmin tiger | cousub | table | gisadmin tiger | direction_lookup | table | gisadmin tiger | edges | table | gisadmin tiger | faces | table | gisadmin tiger | featnames | table | gisadmin tiger | geocode_settings | table | gisadmin tiger | geocode_settings_default | table | gisadmin tiger | loader_lookuptables | table | gisadmin tiger | loader_platform | table | gisadmin tiger | loader_variables | table | gisadmin tiger | pagc_gaz | table | gisadmin tiger | pagc_lex | table | gisadmin tiger | pagc_rules | table | gisadmin tiger | place | table | gisadmin tiger | place_lookup | table | gisadmin tiger | secondary_unit_lookup | table | gisadmin tiger | state | table | gisadmin tiger | state_lookup | table | gisadmin tiger | street_type_lookup | table | gisadmin tiger | tabblock | table | gisadmin tiger | tabblock20 | table | gisadmin tiger | tract | table | gisadmin tiger | zcta5 | table | gisadmin tiger | zip_lookup | table | gisadmin tiger | zip_lookup_all | table | gisadmin tiger | zip_lookup_base | table | gisadmin tiger | zip_state | table | gisadmin tiger | zip_state_loc | table | gisadmin (86 rows) postgis=# postgis=#
Move Geodatabase Data to EDB Postgres Advanced Server using An Enterprise Geodatabase
Right click on the
Database Connectionand selectImportthenFeature Class.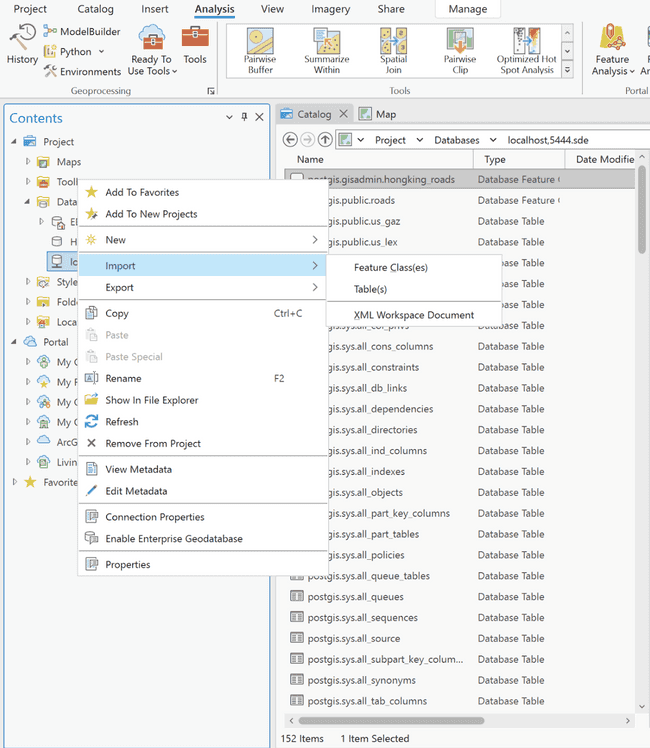
Select the tables from the
File Geodatabaseas the Input Feature and select your Enterprise Geodatabase as the Output Database.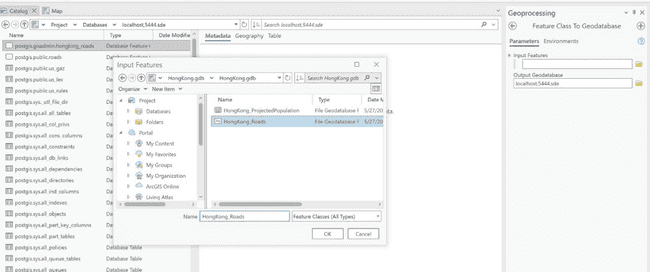
Click on
Run, when the process is successful you will receive a green box with the message,Feature Class to Geodatabase completed.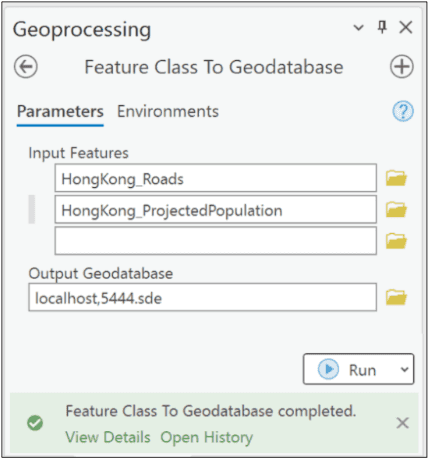
Navigate to the PostGIS database in your EDB Postgres Advanced Server instance to see the tables with data that was moved from Esri ArcGIS Pro, in this instance the HongKong tables were successfully imported.
postgis=#
postgis=# \dn
      List of schemas
   Name    |    Owner
------------+--------------
gisadmin   | gisadmin
public     | enterprisedb
sde        | sde
tiger      | gisadmin
tiger_data | gisadmin
topology   | gisadmin
(6 rows)

postgis=# \dt
                     List of relations
Schema  |             Name             | Type  |  Owner
----------+------------------------------+-------+----------
gisadmin | hongkong_projectedpopulation | table | gisadmin
gisadmin | hongkong_roads               | table | gisadmin
gisadmin | i13                          | table | gisadmin
gisadmin | i14                          | table | gisadmin
public   | roads                        | table | gisadmin
public   | sde_spatial_references       | table | sde
public   | spatial_ref_sys              | table | gisadmin
public   | us_gaz                       | table | gisadmin
public   | us_lex                       | table | gisadmin
public   | us_rules                     | table | gisadmin
sde      | gdb_conflicts                | table | sde
sde      | gdb_itemrelationships        | table | sde
sde      | gdb_itemrelationshiptypes    | table | sde
sde      | gdb_items                    | table | sde
sde      | gdb_itemtypes                | table | sde
sde      | gdb_locks                    | table | sde
sde      | gdb_replicalog               | table | sde
sde      | gdb_tables_last_modified     | table | sde
sde      | i10                          | table | sde
sde      | i11                          | table | sde
sde      | i6                           | table | sde
sde      | i7                           | table | sde
sde      | i8                           | table | sde
sde      | i9                           | table | sde
sde      | sde_archives                 | table | sde
sde      | sde_branch_tables_modified   | table | sde
sde      | sde_branches                 | table | sde
sde      | sde_column_registry          | table | sde
sde      | sde_coordinate_systems       | table | sde
sde      | sde_dbtune                   | table | sde
sde      | sde_layer_locks              | table | sde
sde      | sde_layer_stats              | table | sde
sde      | sde_layers                   | table | sde
sde      | sde_lineages_modified        | table | sde
sde      | sde_locators                 | table | sde
sde      | sde_logfile_pool             | table | sde
sde      | sde_metadata                 | table | sde
sde      | sde_multibranch_tables       | table | sde
sde      | sde_mvtables_modified        | table | sde
sde      | sde_object_ids               | table | sde
sde      | sde_object_locks             | table | sde
sde      | sde_process_information      | table | sde
sde      | sde_raster_columns           | table | sde
sde      | sde_server_config            | table | sde
sde      | sde_state_lineages           | table | sde
sde      | sde_state_locks              | table | sde
sde      | sde_states                   | table | sde
sde      | sde_table_locks              | table | sde
sde      | sde_table_registry           | table | sde
sde      | sde_tables_last_edit_time    | table | sde
sde      | sde_tables_modified          | table | sde
sde      | sde_version                  | table | sde
sde      | sde_versions                 | table | sde
sde      | sde_xml_columns              | table | sde
sde      | sde_xml_index_tags           | table | sde
sde      | sde_xml_indexes              | table | sde
tiger    | addr                         | table | gisadmin
tiger    | addrfeat                     | table | gisadmin
tiger    | bg                           | table | gisadmin
tiger    | county                       | table | gisadmin
tiger    | county_lookup                | table | gisadmin
tiger    | countysub_lookup             | table | gisadmin
tiger    | cousub                       | table | gisadmin
tiger    | direction_lookup             | table | gisadmin
tiger    | edges                        | table | gisadmin
tiger    | faces                        | table | gisadmin
tiger    | featnames                    | table | gisadmin
tiger    | geocode_settings             | table | gisadmin
tiger    | geocode_settings_default     | table | gisadmin
tiger    | loader_lookuptables          | table | gisadmin
tiger    | loader_platform              | table | gisadmin
tiger    | loader_variables             | table | gisadmin
tiger    | pagc_gaz                     | table | gisadmin
tiger    | pagc_lex                     | table | gisadmin
tiger    | pagc_rules                   | table | gisadmin
tiger    | place                        | table | gisadmin
tiger    | place_lookup                 | table | gisadmin
tiger    | secondary_unit_lookup        | table | gisadmin
tiger    | state                        | table | gisadmin
tiger    | state_lookup                 | table | gisadmin
tiger    | street_type_lookup           | table | gisadmin
tiger    | tabblock                     | table | gisadmin
tiger    | tabblock20                   | table | gisadmin
tiger    | tract                        | table | gisadmin
tiger    | zcta5                        | table | gisadmin
tiger    | zip_lookup                   | table | gisadmin
tiger    | zip_lookup_all               | table | gisadmin
tiger    | zip_lookup_base              | table | gisadmin
tiger    | zip_state                    | table | gisadmin
tiger    | zip_state_loc                | table | gisadmin
(90 rows)

postgis=#
Verify the table structure in your EDB Postgres Advanced Server instance with the Esri Table Structure.
postgis=#
postgis=# desc gisadmin.hongkong_projectedpopulation
                     Table "gisadmin.hongkong_projectedpopulation"
            Column              |          Type          | Collation | Nullable | Default
---------------------------------+------------------------+-----------+----------+---------
objectid                        | integer                |           | not null |
tcname                          | character varying(30)  |           |          |
ename                           | character varying(30)  |           |          |
y2014                           | integer                |           |          |
y2015                           | integer                |           |          |
y2016                           | integer                |           |          |
y2017                           | integer                |           |          |
y2018                           | integer                |           |          |
y2019                           | integer                |           |          |
y2020                           | integer                |           |          |
y2021                           | integer                |           |          |
y2022                           | integer                |           |          |
y2023                           | integer                |           |          |
y2024                           | integer                |           |          |
net_change                      | integer                |           |          |
change_percentage               | numeric(38,8)          |           |          |
average_annual_change_percentag | numeric(38,8)          |           |          |
populationtrend                 | character varying(255) |           |          |
gdb_geomattr_data               | bytea                  |           |          |
shape                           | geometry               |           |          |
Indexes:
   "a3_ix1" gist (shape)
   "r14_sde_rowid_uk" UNIQUE, btree (objectid) WITH (fillfactor='75')
Check constraints:
   "enforce_srid_shape" CHECK (st_srid(shape) = 3857)

postgis=#

postgis=#
postgis=# desc gisadmin.hongkong_roads
                     Table "gisadmin.hongkong_roads"
      Column       |          Type          | Collation | Nullable | Default
-------------------+------------------------+-----------+----------+---------
objectid          | integer                |           | not null |
iso_cc            | character varying(4)   |           |          |
name1             | character varying(254) |           |          |
name2             | character varying(254) |           |          |
name3             | character varying(254) |           |          |
name4             | character varying(254) |           |          |
name5             | character varying(254) |           |          |
shield            | character varying(50)  |           |          |
type              | character varying(20)  |           |          |
rank              | integer                |           |          |
rd_feature        | character varying(10)  |           |          |
gdb_geomattr_data | bytea                  |           |          |
shape             | geometry               |           |          |
Indexes:
   "a2_ix1" gist (shape)
   "r13_sde_rowid_uk" UNIQUE, btree (objectid) WITH (fillfactor='75')
Check constraints:
   "enforce_srid_shape" CHECK (st_srid(shape) = 4326)
postgis=#
Verify that the correct data is loaded in the imported Tables in EDB Postgres Advanced Server from Esri ArcGIS Pro using PgAdmin and/or PEM.
The following images display the data that was imported into the EDB Postgres Advanced Server instance from Esri ArcGIS Pro in PgAdmin to visualize table structure and maps.
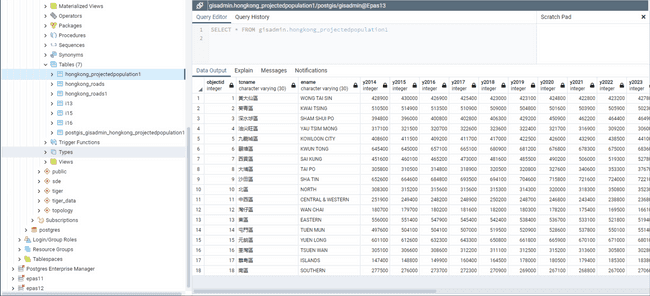
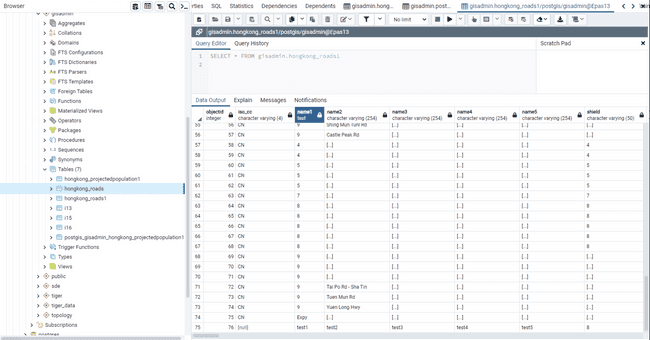
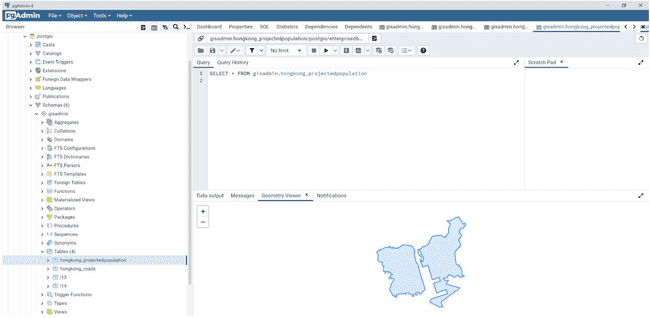
Alternately, display the imported data in ArcGIS Pro on your Esri ArcGIS Map and table, and confirm that it is correct in Esri ArcGIS Pro.
Click on your
Database Connection, and select the required table and click onMap/GeographyorTableto explore the data.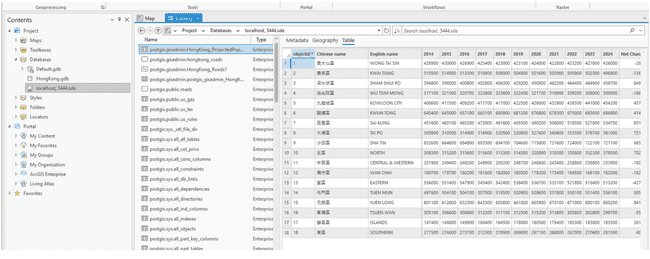
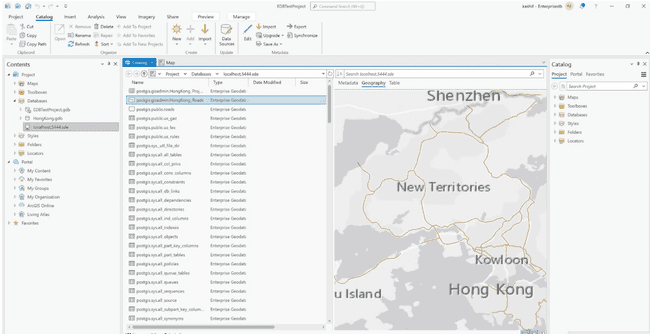
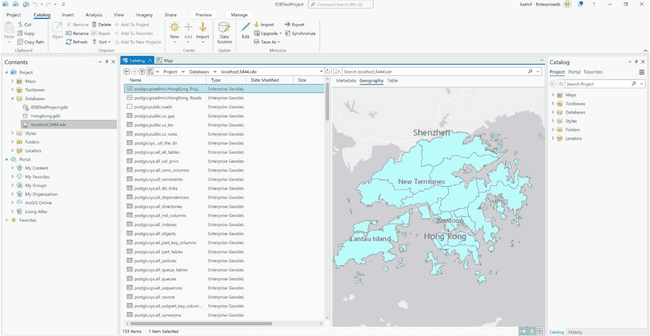
Test any changes in data that you may make in EDB Postgres Advanced Server with Esri ArcGIS Pro. Execute the following commands to change the data in EDB Postgres Advanced Server.
Changing some data in the EDB Postgres Advanced Server instance:
postgis=#
postgis=# update gisadmin.hongkong_roads SET name1='test1', name2='test2' where objectid=1;
UPDATE 1
postgis=#
postgis=# select name1,name2 from gisadmin.hongkong_roads where objectid=1;
name1 | name2
-------+-------
test1 | test2
(1 row)
Checking the data in Esri ArcGis Pro to ensure that the test changes are visible:
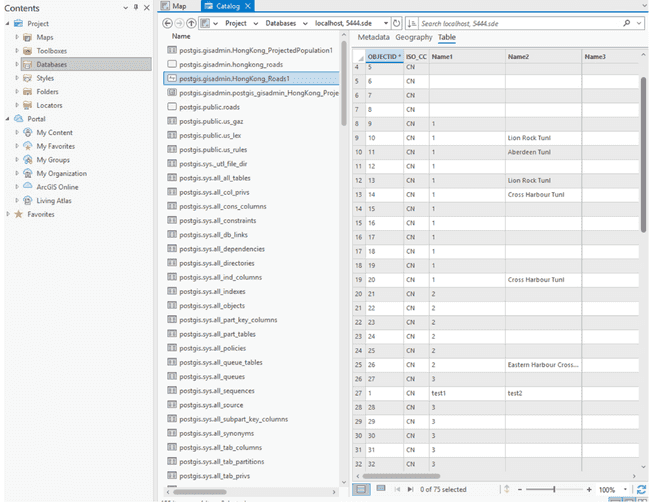
Performing a few more data alterations, deleting some data and inserting new data to test the connections:
postgis=#
postgis=#
postgis=# delete from gisadmin.hongkong_roads where objectid=1;
DELETE 1
postgis=# select name1,name2 from gisadmin.hongkong_roads where objectid=1;
name1 | name2
-------+-------
(0 rows)

postgis=#
postgis=# insert into gisadmin.hongkong_roads values (76,NULL,'test1','test2','test3','test4','test5',8,'Major Road',1,NULL,NULL,NULL);
INSERT 0 1
postgis=#
postgis=#
postgis=# select name1,name2 from gisadmin.hongkong_roads where objectid=76;
name1 | name2
-------+-------
test1 | test2
(1 row)

postgis=#
Displaying the new changes to the data in Esri ArcGIS Pro:
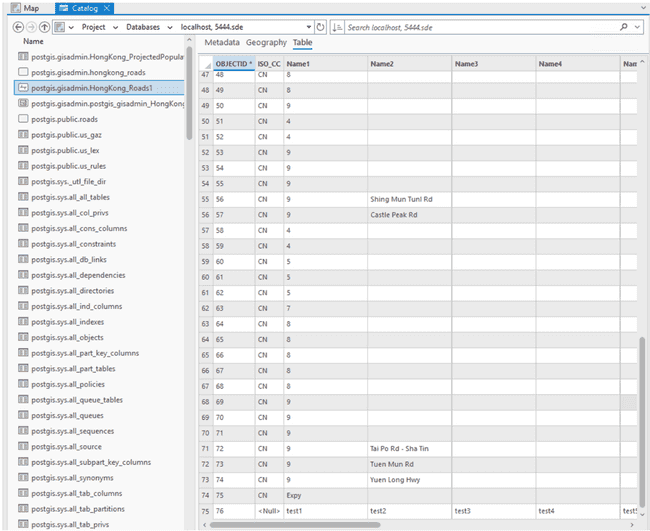
Click on the
Database Connectionand select the changed table, then click onMap/GeographyorTableto confirm the changes are made within Esri ArcGIS Pro from your EDB Postgres Advanced Server database.
Sharing/Publishing a Map from ArcGIS Pro to Enterprise Server
This guide shares a use case in which a map was shared from Esri ArcGIS Pro to an Esri ArcGIS Enterprise Environment. The steps below discuss sharing maps that have been created in Esri ArcGIS Pro and how they can then be viewed in the Esri Portal that is part of an Esri ArcGIS Enterprise Environment.
Right click on the table you want to share, in this case
postgis.gisadmin.HongKong.Roads, and clickAdd to Maps, select the newly added map.Click the
Shareoption in the top menu pane.In the
Share Asgroup, clickWeb Map.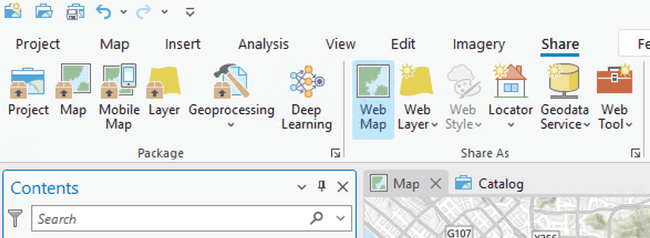
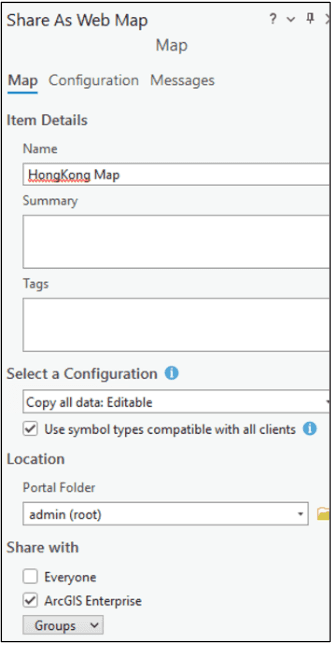
Accept the default name or provide a new name for the web map.
Select a configuration for your web map,
Copy all data: Editablewas selected for this use case.Optionally, click the Folder drop-down arrow and choose or create a folder in your portal content to store the web map.
Specify how the web map will be shared,
ArcGIS Enterpriseis the choice if you are sharing to your Enterprise configuration.The
Use symbol types compatible with all clientsoption is checked by default, you can uncheck it if you need.
The following image displays all of the Web Map options that were checked before selecting Finish Sharing.
Under
Finish Sharing, clickAnalyzeto review for any potential problems. In order to share a map successfully to an Esri ArcGIS Enterprise configuration you must resolve all errors that appear, you do not have to resolve warnings in order to share.After you have resolved errors, and optionally resolved warnings, click
Shareto share the web map.Once the web map has been successfully shared, click the
Manage web maplink at the bottom of the pane to manage the web map in your portal.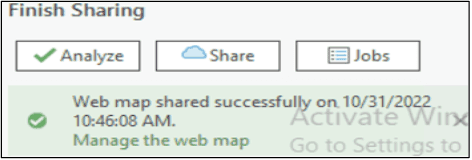
Click the map and select
Open in Map Viewer Classic.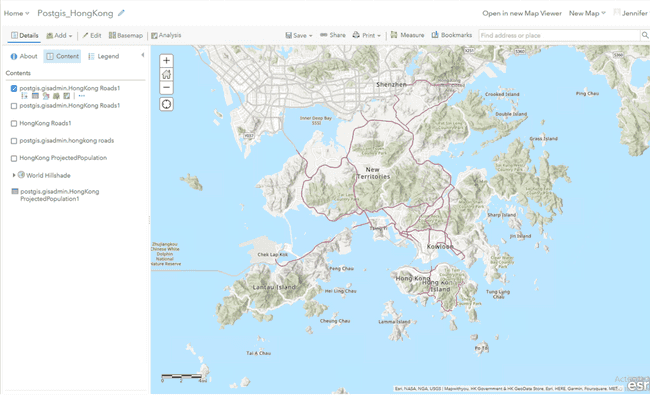
The shared map of the HongKong Roads Table.
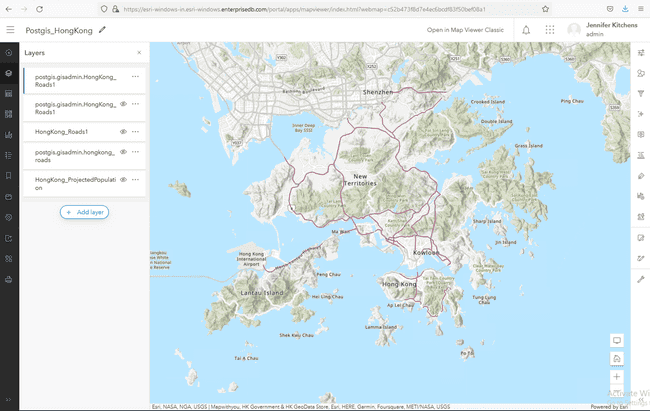
The shared map of the HongKong Population Table.
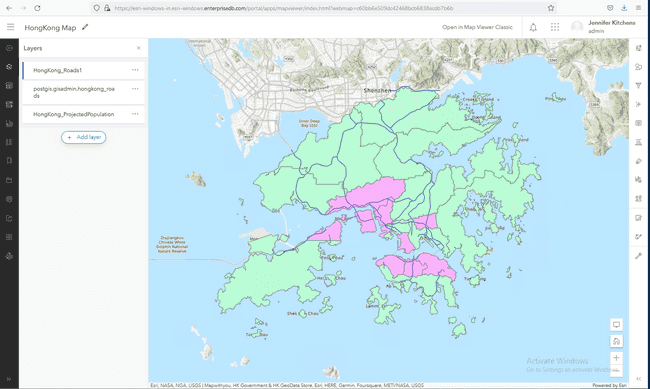
Click
Saveto save the Map in your portal.Optionally, click
Open in Map Viewerto check the contents in the map.Go to your
Portaland then navigate to theContentssection and saved Maps and data that was shared are there.
You can click on each map individually in the Contents pane of your Portal to see its details.
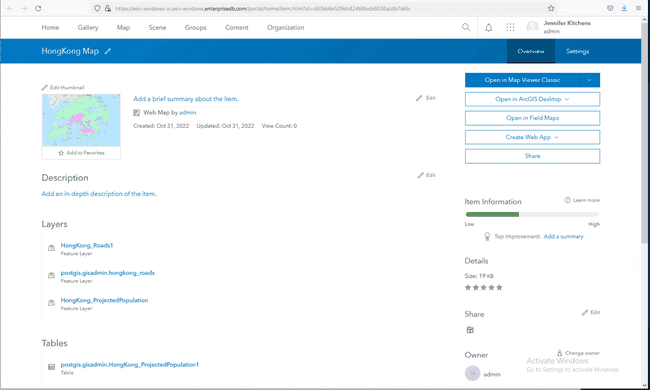
Could this page be better? Report a problem or suggest an addition!